Python安装
Python基础知识
标识符 英文/数字/下划线
单下划线开头
_foo 不能直接访问的类属性(private)需提供接口 不能用 from xxx import * 导入
双下划线开头
__foo 私有成员
双下划线开头结尾
foo 特殊方法专用标识 init() 构造函数
成员属性(字段)/实例属性(map)/类属性(静态公有变量)

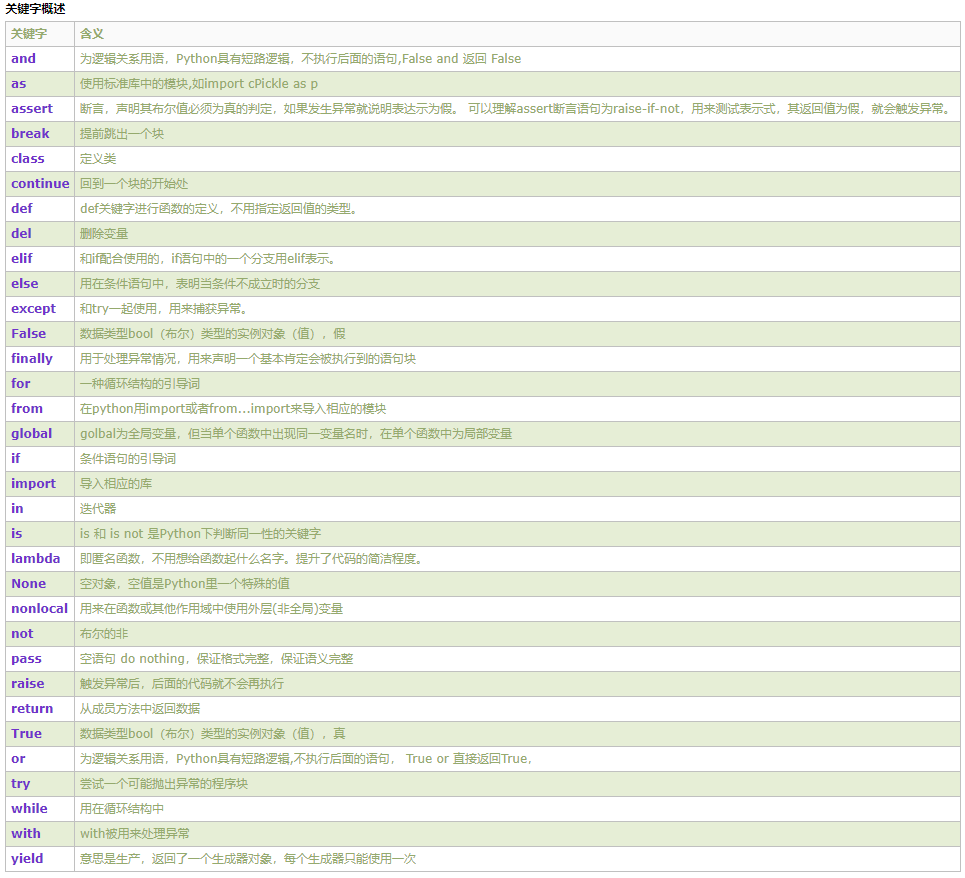
关键字

数据类型(5)
Number(数字) String(字符串) List(列表) Tuple(元组) Dictionatry(字典)
Python函数
def func_name(param_name):
    print(param_name)
安装包
cd {安装路径}/Scripts
pip install {package}
pip install --upgrade {package}
conda
conda是一种可用于python的包管理工具
如果系统没有安装python环境,也可以使用 conda 内置的python安装包
# linux安装 miniconda
wget -c https://repo.continuum.io/miniconda/Miniconda3-latest-Linux-x86_64.sh

chmod 777 Miniconda3-latest-Linux-x86_64.sh
sh Miniconda3-latest-Linux-x86_64.sh # 是否初始化 miniconda3 选择 yeswindows 安装成功后使用对应的控制面板 >>> Anaconda Prompt
# 如果找不到控制面板,进入安装目录
python .\Lib\_nsis.py mkmenus
conda --version
python --version
pip --version
配置阿里数据源
conda config --set show_channel_urls yes # windows 生成 .condarc 文件配置
conda clean -i # 配置完成后,清理索引缓存
conda config --show channels # 展示所有镜像源
conda clean --all # 清理所有缓存- 用户目录下 .condarc 文件配置
channels:
  - defaults
show_channel_urls: true
default_channels:
  - http://mirrors.aliyun.com/anaconda/pkgs/main
  - http://mirrors.aliyun.com/anaconda/pkgs/r
  - http://mirrors.aliyun.com/anaconda/pkgs/msys2
custom_channels:
  conda-forge: http://mirrors.aliyun.com/anaconda/cloud
  msys2: http://mirrors.aliyun.com/anaconda/cloud
  bioconda: http://mirrors.aliyun.com/anaconda/cloud
  menpo: http://mirrors.aliyun.com/anaconda/cloud
  pytorch: http://mirrors.aliyun.com/anaconda/cloud
  simpleitk: http://mirrors.aliyun.com/anaconda/cloud
envs_dirs:
- E:/data/miniconda3/envs
channels:
- http://mirrors.tuna.tsinghua.edu.cn/anaconda/pkgs/free/
- http://mirrors.tuna.tsinghua.edu.cn/anaconda/cloud/conda-forge/
- http://mirrors.tuna.tsinghua.edu.cn/anaconda/cloud/msys2/
default_channels:
- http://mirrors.tuna.tsinghua.edu.cn/anaconda/pkgs/main
- http://mirrors.tuna.tsinghua.edu.cn/anaconda/pkgs/r
show_channel_urls: true设置默认下载的镜像地址
注意: 可以先安装包、如果包下载异常才考虑用镜像 或者 考虑用 pip 下载工具
# https://mirrors.tuna.tsinghua.edu.cn/help/pypi/
conda config --add channels https://mirrors.tuna.tsinghua.edu.cn/anaconda/pkgs/free/ # 增加清华大学镜像源
conda config --remove channels <镜像源>  # 删除指定镜像源镜像
conda config --remove-key channels # 删除全部镜像源
conda config --write # 保存配置
conda config --default-channel # windows环境无法使用该命令设置默认镜像源
conda config --set-default-channel https://mirrors.tuna.tsinghua.edu.cn/anaconda/pkgs/free # 将某镜像设置为默认通道
conda config --show channels # 展示所有镜像源
添加常用的镜像源
conda config --add channels https://mirrors.tuna.tsinghua.edu.cn/anaconda/pkgs/main/
conda config --add channels https://mirrors.tuna.tsinghua.edu.cn/anaconda/pkgs/free/
conda config --add channels https://mirrors.tuna.tsinghua.edu.cn/anaconda/cloud/conda-forge/
conda config --add channels https://mirrors.tuna.tsinghua.edu.cn/anaconda/cloud/pytorch/
conda创建环境
- conda是为了解决不同python项目依赖差异的问题, 可以创建多个环境处理这个问题
conda update -n base -c defaults conda # 版本升级
conda env list # 查看所有已经传教的环境
conda create --name <envname> # 创建一个新的conda环境
conda create -n chatglm --clone base # 创建一个克隆环境
conda create --prefix=E:/data/miniconda3/envs/chatGLM # 显式的指定路径,激活也需要指定路径,比较麻烦,可以直接更改环境地址
conda config --append envs_dirs E:/data/miniconda3/envs # 配置环境所在的默认路径
conda create --name snapshot --clone myenv # 从已有的环境克隆配置新环境
conda activate <envname> # 激活新的环境
conda deactivate # 退出环境
conda env remove --name <envname> # 删除环境
conda install --file requirements.txt # 安装项目要求的环境依赖项
conda list # 验证所有依赖项是否已经安装正确
conda简单命令
conda update conda # 更新最新版本 conda
conda install python=3.13 # https://www.python.org/getit/
conda install <package> # 安装包
conda install <package>=<version> # 安装指定版本包
conda update <package> # 更新包
conda remove <package> # 卸载包
conda search <package> # 搜索包
conda list [-n [env_name]] # 展示当前环境安装的所有包 -n 指定环境名称
conda list <package> # 查看指定包版本信息
conda info --envs # 查看环境中的安装包版本
conda clean --all # 清理不再使用的包
conda env export > environment.yml # 导出环境配置
conda list -e > requirements.txt # 导出当前环境版本
conda env create --file environment.yml # 导入环境配置
uv
- uv 凭借其极速和现代化设计,正在成为 Python 开发者的新宠
## 安装uv (windows如何安装?)
# 使用 curl
curl -LsSf https://astral.sh/uv/install.sh | sh
# 或使用 wget
wget -qO- https://astral.sh/uv/install.sh | sh
# 安装完成后,按提示符将uv添加到环境变量
source ~/.bashrc  # 或 source ~/.zshrc(使用 Zsh 时)
# 验证安装
uv --version- windows安装uv
# 方案一:通过PowerShell一键安装
# 使用官方安装脚本(需科学上网或网络畅通)
irm https://astral.sh/uv/install.ps1 | iex
# 将 uv 添加到当前会话的环境变量
$env:Path += ";$env:USERPROFILE\.cargo\bin"
# 安装完成后,将uv添加到系统环境变量,永久生效(可选)
[System.Environment]::SetEnvironmentVariable("Path", [System.Environment]::GetEnvironmentVariable("Path", [System.EnvironmentVariableTarget]::User) + ";$env:USERPROFILE\.cargo\bin", [System.EnvironmentVariableTarget]::User)

# 方案二:通过pipx安装(废弃:高版本可以一键安装)
python -m pip install --user pipx
# 卸载 pipx
python -m pip uninstall pipx
python -m pipx ensurepath
# 查看系统缓存路径
pipx environment
# pipx更改缓存路径;更改系统缓存变量
PIPX_HOME = E:\python\pipx
PIPX_BIN_DIR = %PIPX_HOME%\bin
PIPX_MAN_DIR = %PIPX_HOME%\share\man
PIPX_CACHE_DIR = %PIPX_HOME%\.cache
# 安装uv
pipx install uv

# 方案三: pip 安装;不建议:环境较复杂
pip install uv --user

# 方案四:二进制安装或cargo编辑安装

# uv官网: https://docs.astral.sh/uv/getting-started/installation/#cargo
# 验证安装
uv --version

# uv查看默认缓存路径
uv cache dir
# 更改默认缓存路径:永久更改在系统环境变量中进行
# 临时设置(仅当前终端会话生效)
export UV_CACHE_DIR=/path/to/custom_cache
# Windows(PowerShell): 临时设置
$env:UV_CACHE_DIR = "E:\data\uv\cache"# 创建虚拟环境
uv venv myenv # 创建名为 myenv 的虚拟环境
# 激活虚拟环境
source myenv/bin/activate
# 激活虚拟环境 windows
.\myenv\Scripts\activate
# 查看可用的python环境
uv python list
# 指定python环境创建虚拟环境
uv venv --python 3.11.6 # https://zhuanlan.zhihu.com/p/689976933
## 设置当前实用的python环境
uv python pin 3.13
# 安装依赖包
uv pip install numpy pandas # 单包或多包安装
uv pip install -r requirements.txt # 从文件安装
# 生成锁定文件
uv pip compile requirements.in -o requirements.txt # 生成精确依赖版本
# 运行python脚本
uv run main.py # 自动解析依赖并运行(实验性功能)
# 退出虚拟环境
deactivate
# 替代pip命令
uv pip list # 查看已安装包
uv pip uninstall <package> # 卸载包
uv pip freeze # 导出依赖列表
# 依赖解析加速
uv pip install --resolution=fast # 快速解析模式(忽略次要版本冲突)
# 配置镜像源(国内加速)
uv pip config set global.index-url https://pypi.tuna.tsinghua.edu.cn/simple
# windows更改环境变量
UV_DEFAULT_INDEX=https://pypi.tuna.tsinghua.edu.cn/simple
## 处理 toml 管理的项目
# 安装项目依赖(普通模式)
uv pip install .
# 或者以可编辑模式安装(开发时推荐)
uv pip install -e .
# 如果项目中定义了开发依赖[tool.poetry.dev-dependencies] 可使用 -d 参数安装
uv pip install -e . -E dev # -d 命令是 pip 执行的命令
# 启动项目
python main.py
# 如果项目定义了命令行工具,可以使用提示的命令行工具启动
# pyproject.toml 示例
[tool.poetry.scripts]
mycli = "mypackage:main"字符串转json
import json
# len(str) > 0
json.loads(str)
发送HTTP请求
引入 requests 包
import requests- 发送请求(包括请求行、方法类型、头、体) & 常见的请求方式有get、post、put、delete
发送get请求
格式:requests.get() (内容: url必填; params选填:url参数字典)
无参数的get请求
res = requests.get(url='https://yz.chsi.com.cn/zsml/pages/getMl.jsp')
# 打印响应主体内容,字符串格式
print(res.text)
有参数的get请求
res = requests.get(url='https://yz.chsi.com.cn/zsml/code/zy.do',
                   params={"q": '0101'})
# 打印响应主体内容,字符串格式
print(res.text)
发送post请求
知识扩展
- requests.post() post请求分为5种,常用的有三种,如下
- ① application/x-www-form-urlencod (form表单);
- ② raw (纯文本格式):有5种格式,分别为json/xml/Html/Text/JavaScrip
- ③ multipart/form-data (复合式表单)
有正文体的post请求
form表单(application/x-www-form-urlencod) ----data 后跟字典
eg.1: 带参数的查询接口
res = requests.post(url='http://ws.webxml.com.cn/WebServices/WeatherWS.asmx/getSupportCityString',
headers={"Content-Type": "application/x-www-form-urlencoded"},
data={"theRegionCode": 3113})
print(res.text)
eg.2: 带账号名密码的登录接口
res = requests.post(url='http://123.56.99.53:9000/event/api/admin/',
headers={"Content-Type": "application/x-www-form-urlencoded"},
data={"username": "admin", "password": "MTIzYWRtaW4="})
print(res.text)
纯文本格式(raw)
~ xml格式 ----data 后跟字符串
res = requests.post(url='http://ws.webxml.com.cn/WebServices/WeatherWS.asmx',
headers ={"Content-Type": "text/xml; charset=utf-8",
"SOAPAction": "http://WebXml.com.cn/getSupportCityString"},
data = '''<?xml version="1.0" encoding="utf-8"?>
<soap:Envelope xmlns:xsi="http://www.w3.org/2001/XMLSchema-instance" xmlns:xsd="http://www.w3.org/2001/XMLSchema" xmlns:soap="http://schemas.xmlsoap.org/soap/envelope/">
<soap:Body>
<getSupportCityString xmlns="http://WebXml.com.cn/">
<theRegionCode>string</theRegionCode>
</getSupportCityString>
</soap:Body>
</soap:Envelope>''')
print(res.text)
~json格式 ----- json 后跟字典(常用), or ----data 后跟json字符串
res = requests.post(url='http://123.56.99.53:5000/event/weather/getWeather/',
headers={"Content-Type": "application/json"},
json={"theCityCode": "1001"})
print(res.text)
json后面跟的是字典即json={“theCityCode”: “1001”}),可改成 data=‘{“theCityCode”: “1001”})’;字典能自动转为json字符串,所以一般用字典表示;建议纯json正文的接口使用第一种方式,除非是较长的字符串
复合式表单(multipart/form-data ) ------上传二进制文件 ---- key value (接口名称:文件名)
res = requests.post(url='http://123.56.99.53:9001/api/uploadFile/',
headers={"Cookie": "uid=1;token=44c972f05d76fdd93c31f9c2b65bb098f308cdfc"
#"Content-Type": "multipart/form-data"},
#有的接口不需要写正文体格式,老服务器一般需要写
              files={"myfile1": open('D:\全力以富\1.docx', 'rb')
                     #"myfile2: open(上传多个文件)"})
print(res.text)
上传接口 files={‘文件路径’,‘rb’} rb表示
问题解决
pycharm提示ModuleNotFoundError: No module named requests
File > Settings > Project: {project-name} > Python Interpreter


